When I was planning my first Kickstarter for my webcomic Love Debut, I was nail-bitingly nervous. Part of it, of course, was the big question of whether I’d manage to get the funding I needed, but it didn’t help that I didn’t even know what kind of tools would be at my disposal. I felt like I was going in blind.
So, here I am with an overview of what it looks like to plan and launch a Kickstarter campaign from an administrative perspective. This will NOT focus on the business or marketing side of things. If you’re looking for general advice, I highly recommend shelling out the $5 for Spike’s Let’s Kickstart a Comic!

1) Preparing to Submit for Review
Maybe a few years ago it was more difficult for comics to get approved for go-live, but nowadays, it’s all automatic. The key is to fill out as much information as you can. Some of the sections are required, like your personal information and the project description. Other sections are optional, but highly recommended, like the project video.
Required:
Basics
- Project image
- Project title
- Project location
- Short blurb
- Funding end date
- Funding goal
Rewards
- Gotta have at least one!
More on Rewards: This is where you can break out shipping. Kickstarter lets you customize per country, or give a flat rate, or no rate at all. Money pledged on shipping counts toward your funding goal. Also, logging individual items to each reward tier creates a checklist for backers to use later on.
Story
- Description
- Risks
About You
- Name
- Location
Account
- Email
- Payment Source
- Identity and bank account
- Identity and bank account must be verified
Take your time filling out the sections and reviewing your campaign in Preview mode to see how it all reads. You want to have some basic info pop out at the casual browser while also providing enough detail for those who like to dig into a project and really understand what it’s about. One cool feature? The ability to share a preview with your friends for feedback. If they’re logged into their Kickstarter accounts, they can leave comments directly on the page. Also, they can choose to get an email alert when your campaign launches!

Once you have all the requirements completed, viola! You are ready to launch.
2) The Project Dashboard
Here is how your project will more or less appear after launch. Some differences: the option ‘Edit Project’ is missing in the menu, and you won’t be able to access ‘Reward surveys’ or ‘Page theme’ until after your project has been funded successfully.

Edit Project: You can’t change certain information after launch, like your funding goal or the campaign duration. That said, you can update your project story to reflect new information (like unlocked stretch goals) and add Frequently Asked Questions at the bottom of your campaign page.
With respect to rewards, you can create new reward tiers and edit the number of available spots on existing rewards. Once a reward tier has at least 1 backer, however, you can no longer alter the reward description.
Post Updates: You can post updates that are either public OR targeted toward specific reward tiers. The menu will track the date of your last update. Updates are rich text posts with the option to upload videos and photos. After you’ve previewed your draft, you can either save it for later or hit ‘Publish’. Once you publish, be warned: you have a window of 30 minutes to make any edits before your post is locked. Backers with access to the post will also receive an email update.

Kickstarter Live: Never used this. This is for streaming live video; Kickstarter gives you some extra tools to promote a scheduled stream on your project page.
Dashboard: This is where the magic lives!! Kickstarter tracks backer activity, pledges, and referral traffic all right here. I pretty much lived on this page during the 30 days my campaign was in progress.
 |
| A large portion of pledges came from people who discovered me over Kickstarter! |
 |
| Expect backers to adjust and even cancel pledges throughout the campaign. |
Backer Report: Didn’t use this much during the campaign, but afterwards, I found this extremely helpful for messaging groups of backers at a time and following up with any individuals. Data can be exported into a CSV.
Messages: You are going to get a lot of marketing spam in here, but make sure you check back frequently in case any of your backers (or potential backers) have questions for you.
Collaborators: Here you can manage your collaborators, inviting them to join and assigning them permissions.

3) Reporting
When you’re first setting up your project, there’s an option on the “About You” page to enter your Google Analytics tracking ID. I filled this out just because I could, but I ended up not using Google Analytics at all. As I mentioned above, the Kickstarter Dashboard had more than enough data for me to sink my teeth into.
Of particular interest to me was tracking my referrers. I would be posting about my campaign across social media channels, and I wanted to know which ones were the most successful. Because I didn’t know any better, I set up custom referral links for each of my social media channels and used them when promoting the campaign. This is totally unnecessary. Kickstarter will automatically break out the domain names of external referrals, so if you simply want to know how much traffic is coming from Facebook vs. Twitter vs. Tumblr, you’re covered.
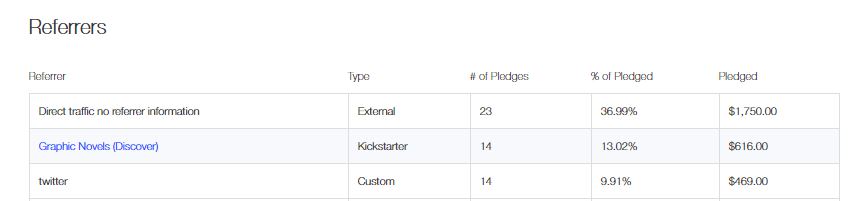
IF, however, you want to know which *post* generated a certain amount of revenue, then this is the way to go. I imagine if you did Facebook promoted posts or other types of targeted ad campaigns, it would be a lot more helpful. Instead, I ended up with a bunch of duplicate sources that I had to manually add up. Ah well.
4) Backer Surveys
Once the campaign is over and you’ve (hopefully!) funded successfully, it’s time to think about fulfillment. The last important tool Kickstarter provides are the Backer Surveys.

Backer Surveys are pretty limited; you can only send them one at a time to each reward tier you offer, and once sent, you cannot use them again. (If you need to get more information, you have to go through the Messages channel or look up the backer email addresses.)
When you create a survey, certain questions and information are preloaded for you. Nevertheless, you can customize the form by removing questions and adding your own. The two custom question types available are Text and Multiple Choice. The Address question is a special type; this is the only question that you can let backers update later -- extremely useful if you send out the backer survey early after funding your campaign, but won’t actually ship until much later. Once you’re ready to ship, you can lock the field to prevent further edits.

And that’s it!
Whew, that was a long post! I hope you found the content helpful. If there are any other good Kickstarter resources you recommend, make sure to leave a comment below!
Related Articles:
You can follow Nika on Twitter @onelemonylime or visit her website at nikacomics.com
Great article, Nika! I second getting Spike's "Let's Kickstart A Comic!" -- it was incredibly helpful and I referred to it for both comic Kickstarters. There's a new PDF in the Iron Circus Comics shop about setting up to print in general (Let's Print A Comic!), and I sure wish I had that one before my first KS!
ReplyDeleteThank you!! Yeah Spike has some great resources, I've been meaning to check out "Let's Print A Comic!"
DeleteGreat Article
ReplyDeleteProject Centers in Chennai
Final Year Project Domains for CSE
JavaScript Training in Chennai
JavaScript Training in Chennai
This comment has been removed by the author.
ReplyDelete